Dubai Chocolate Cake Recipe
Introduction
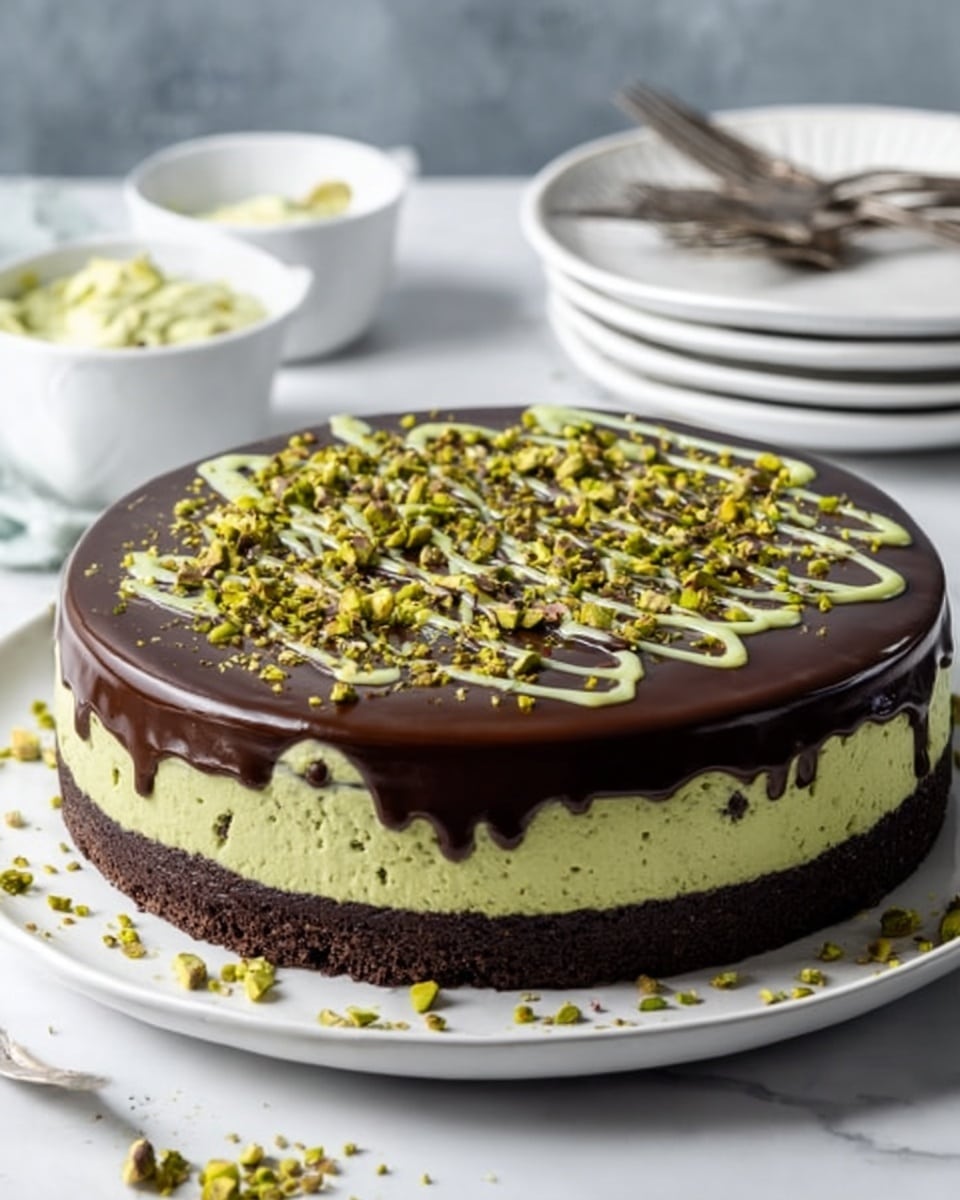
Dubai Chocolate Cake is a decadent dessert perfect for lovers of rich, moist chocolate cake with a luxurious twist. Inspired by vibrant Dubai flavors, it combines a moist chocolate cake with a crunchy pistachio filling and a velvety chocolate topping. This showstopper cake will impress at any gathering.
Ingredients
- 1 cup all-purpose flour
- 1 cup granulated sugar
- ¼ cup unsweetened cocoa powder, preferably dutch processed
- 1 teaspoon baking powder
- ½ teaspoon baking soda
- ¼ teaspoon salt
- 1 large egg
- 1 teaspoon vanilla extract
- ½ cup milk
- ½ cup vegetable oil
- ½ cup hot coffee
- 2 cups shredded phyllo dough (kataifi), finely chopped
- 2 tablespoons butter
- 1 cup pistachio cream
- 4 oz milk or semi-sweet chocolate bar
- ½ cup heavy cream, or a can of table cream
Instructions
- Step 1: Preheat the oven to 350℉. Grease a 9-inch square or round baking pan and set aside.
- Step 2: Make the cake layer: In a large bowl, whisk together the flour, sugar, cocoa powder, baking powder, baking soda, and salt. Add the egg, vanilla, milk, and oil, then whisk to combine. Stir in the hot coffee until smooth. Pour batter into the prepared pan.
- Step 3: Bake for 25 minutes, or until a toothpick inserted into the center comes out clean. Allow to cool for 10–15 minutes.
- Step 4: Prepare the pistachio filling: Heat a large pan over medium heat. Add the chopped kataifi and butter, stirring occasionally until golden brown and crispy. Transfer to a bowl to cool, then gently mix in the pistachio cream.
- Step 5: Make the chocolate layer: Chop the chocolate into small pieces. In a microwave-safe bowl, combine the chocolate and cream. Microwave for about 45 seconds until the cream is warm. Let sit 3–5 minutes, then whisk until smooth and melted.
- Step 6: Assemble the cake: Spread the pistachio mixture evenly over the cooled cake. Pour the chocolate sauce over the pistachio layer. Garnish with extra pistachio sauce, toasted kataifi, or crushed pistachios if desired.
- Step 7: Serve immediately warm or chill to set in the fridge before serving.
Tips & Variations
- Use room temperature ingredients to ensure an even, smooth batter.
- Don’t skip the coffee—it enhances the chocolate flavor without making the cake taste like coffee.
- Avoid overmixing the batter to keep the cake tender and light.
- Use high-quality chocolate like Ghirardelli for the best flavor and texture.
- For a darker, less sweet ganache, swap milk chocolate for dark chocolate.
- Add a pinch of cinnamon or cardamom to the batter for a warm, aromatic twist.
Storage
Store leftovers in an airtight container in the refrigerator for up to 4 days. You can freeze the cake (without the topping or filling) for up to 2 months; wrap it tightly in plastic wrap and foil. Thaw in the fridge before adding pistachio filling and chocolate layer. To serve warm, microwave individual slices for 10–15 seconds.
How to Serve

Serve this delicious recipe with your favorite sides.
FAQs
Can I make this ahead of time?
Yes, you can bake the cake a day in advance and store it in an airtight container. For the best texture, add the pistachio filling and chocolate topping just before serving.
Can I make this Dubai chocolate cake without coffee?
Yes, coffee enhances the chocolate’s depth of flavor but can be replaced with hot water or hot milk if preferred.
PrintDubai Chocolate Cake Recipe

Dubai Chocolate Cake is a decadent Middle Eastern-inspired dessert featuring a super moist chocolate cake layered with a crunchy pistachio kataifi filling and topped with a silky chocolate ganache made from melted chocolate and cream. This indulgent cake combines rich chocolate flavors enhanced by coffee with a unique pistachio texture, creating a luxurious treat perfect for any special occasion.
- Prep Time: 20 minutes
- Cook Time: 25 minutes
- Total Time: 55 minutes
- Yield: 12 slices 1x
- Category: Dessert
- Method: Baking
- Cuisine: Middle Eastern
Ingredients
Chocolate Cake Layer
- 1 cup all-purpose flour
- 1 cup granulated sugar
- ¼ cup unsweetened cocoa powder, preferably Dutch processed
- 1 teaspoon baking powder
- ½ teaspoon baking soda
- ¼ teaspoon salt
- 1 large egg
- 1 teaspoon vanilla extract
- ½ cup milk
- ½ cup vegetable oil
- ½ cup hot coffee
Pistachio Filling
- 2 cups shredded phyllo dough (kataifi), finely chopped
- 2 tablespoons butter
- 1 cup pistachio cream
Chocolate Layer
- 4 oz milk or semi-sweet chocolate bar
- ½ cup heavy cream, or a can of table cream (for traditional richness)
Instructions
- Preheat and prepare pan: Preheat the oven to 350℉ (175℃). Grease a 9-inch square or round baking pan and set aside to ensure the cake does not stick during baking.
- Make cake layer: In a large mixing bowl, whisk together the dry ingredients: all-purpose flour, granulated sugar, cocoa powder, baking powder, baking soda, and salt. Add the egg, vanilla extract, milk, and vegetable oil then whisk until combined. Stir in the hot coffee last and whisk until the batter is smooth and uniform. Pour the batter into the prepared pan and bake for 25 minutes, or until a toothpick inserted into the center comes out clean.
- Prepare pistachio filling: While the cake bakes, heat a large heavy-duty pan over medium heat. Add the finely chopped kataifi and butter, stirring occasionally as the mixture cooks until golden brown and crispy. Transfer the toasted kataifi to a medium mixing bowl and let it cool slightly before mixing in the pistachio cream until evenly combined.
- Make chocolate layer: Chop the chocolate bar into small chunks. Place chocolate and heavy cream (or table cream) in a microwave-safe bowl. Microwave for about 45 to 60 seconds, or until the cream is warmed through and the chocolate begins to melt. Let the mixture sit at room temperature for 3-5 minutes, then whisk gently until smooth and glossy.
- Assemble the cake: After removing the cake from the oven, allow it to cool for 10-15 minutes. Spread the pistachio filling evenly over the cake using an offset spatula. Pour the chocolate ganache evenly on top of the pistachio layer. Garnish with extra pistachio sauce, toasted kataifi, and/or crushed pistachios if desired. Serve immediately warm or chill to set for a firmer texture.
Notes
- Use room temperature ingredients to ensure even mixing and a smooth batter.
- Adding hot coffee enhances the chocolate flavor without imparting a coffee taste.
- Avoid overmixing the batter to keep the cake light and tender.
- High-quality chocolate bars such as Ghirardelli, Lidl, Aldi, Cadbury, or Milka yield the best melting and flavor results.
- Table cream can be substituted for heavy cream for a richer, creamier Middle Eastern-style ganache and can be found in Middle Eastern markets or Hispanic food aisles.
Keywords: chocolate cake, dubai cake, pistachio cake, Middle Eastern dessert, kataifi cake, chocolate ganache